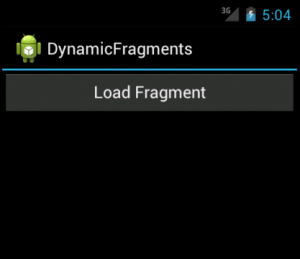
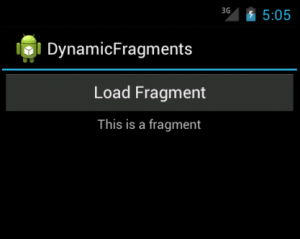
Fragments are more often used for user interfacepurposes. Fragments are used when the user wants to see two different views of two different classes on the same screen. In this article , we will create an Android application in which a fragment can be added to an activity on a button click.
1) Create an Android project namely “DynamicFragments”
2) res/values/strings.xml
<?xml version=”1.0″ encoding=”utf-8″?>
<resources>
<string name=”hello”>Hello World, MainActivity!</string>
<string name=”app_name”>DynamicFragments</string>
<string name=”str_btn_load”>Load Fragment</string>
<string name=”str_tv_fragment”>This is a fragment</string>
</resources>
3) res/layout/hello_fragment_layout.xml
<?xml version=”1.0″ encoding=”utf-8″?>
<LinearLayout xmlns:android=”http://schemas.android.com/apk/res/android”
android:layout_width=”match_parent”
android:layout_height=”match_parent”
android:orientation=”vertical” >
<TextView
android:layout_width=”wrap_content”
android:layout_height=”wrap_content”
android:layout_gravity=”center_horizontal”
android:text=”@string/str_tv_fragment”
/>
</LinearLayout>
4) src/in/w2class/dynamicfragments/HelloFragment.java
package in.w2class.dynamicfragments;
import android.app.Fragment;
import android.os.Bundle;
import android.view.LayoutInflater;
import android.view.View;
import android.view.ViewGroup;
public class HelloFragment extends Fragment {
@Override
public View onCreateView(LayoutInflater inflater, ViewGroup container, Bundle savedInstanceState) {
/** Inflating the layout for this fragment **/
View v = inflater.inflate(R.layout.hello_fragment_layout, null);
return v;
}
}
5) res/layout/main.xml
<?xml version=”1.0″ encoding=”utf-8″?>
<LinearLayout xmlns:android=”http://schemas.android.com/apk/res/android”
android:layout_width=”fill_parent”
android:layout_height=”fill_parent”
android:orientation=”vertical” >
<Button
android:id=”@+id/btn_load”
android:layout_width=”fill_parent”
android:layout_height=”wrap_content”
android:text=”@string/str_btn_load”
/>
<LinearLayout
android:id=”@+id/fragment_container”
android:layout_width=”fill_parent”
android:layout_height=”wrap_content”
android:orientation=”vertical”
>
</LinearLayout>
</LinearLayout>
6) src/in/w2class/dynamicfragments/MainActivity.java
package in.w2class.dynamicfragments;
import android.app.Activity;
import android.app.FragmentManager;
import android.app.FragmentTransaction;
import android.os.Bundle;
import android.view.View;
import android.view.View.OnClickListener;
import android.widget.Button;
public class MainActivity extends Activity {
/** Called when the activity is first created. */
@Override
public void onCreate(Bundle savedInstanceState) {
super.onCreate(savedInstanceState);
setContentView(R.layout.main);
Button btnLoad = (Button) findViewById(R.id.btn_load);
OnClickListener listener = new OnClickListener() {
@Override
public void onClick(View v) {
FragmentManager fragmentManager = getFragmentManager();
FragmentTransaction fragmentTransaction = fragmentManager.beginTransaction();
HelloFragment hello = new HelloFragment();
fragmentTransaction.add(R.id.fragment_container, hello, “HELLO”);
fragmentTransaction.commit();
}
};
btnLoad.setOnClickListener(listener);
}
}
7) Execute the application
On clicking the “Load Fragment” button of the Figure 4, a fragment will be loaded as shown in the Figure
 W2class Tutorials for Android, Java, Php, Html

