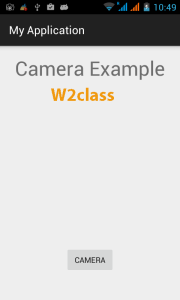
Camera is mainly used to capture picture and video. We can control the camera by using methods of camera api.
Android provides the facility to work on camera by 2 ways:
1) By Camera Intent
2) By Camera API
Understanding basic classes of Camera Intent and API
There are mainly four classes that we are going to discuss.
1) Intent
By the help of 2 constants of MediaStore class, we can capture picture and video without using the instance of Camera class.
ACTION_IMAGE_CAPTURE
ACTION_VIDEO_CAPTURE
2) Camera
It is main class of camera api, that can be used to take picture and video.
3) SurfaceView
It represents a surface view ore preview of live camera.
4) MediaRecorder
It is used to record video using camera. It can also be used to record audio files as we have seen in the previous example of media framework.
Android camera app example by camera intent
Here is an example that shows how to launch the existing camera application to capture an image and display the result in the form of bitmap
To experiment with this example , you need to run this on an actual device on which camera is supported.
1) MainActivity.java
package com.w2class.myapplication;

import android.bluetooth.BluetoothAdapter;
import android.bluetooth.BluetoothDevice;

import android.content.ClipData;
import android.content.ClipboardManager;
import android.content.DialogInterface;
import android.content.Intent;
import android.content.IntentFilter;

import android.graphics.Bitmap;
import android.os.BatteryManager;
import android.support.v7.app.ActionBarActivity;
import android.os.Bundle;

import android.view.Menu;
import android.view.MenuItem;
import android.view.View;

import android.widget.ArrayAdapter;
import android.widget.Button;
import android.widget.EditText;
import android.widget.ImageView;
import android.widget.ListView;
import android.widget.TextView;
import android.widget.Toast;

import java.util.ArrayList;
import java.util.Set;

public class MainActivity extends ActionBarActivity {
Button b1,b2;
ImageView iv;

@Override
protected void onCreate(Bundle savedInstanceState) {
super.onCreate(savedInstanceState);
setContentView(R.layout.activity_main);

b1=(Button)findViewById(R.id.button);
iv=(ImageView)findViewById(R.id.imageView);

b1.setOnClickListener(new View.OnClickListener() {
@Override
public void onClick(View v) {
Intent intent = new Intent(android.provider.MediaStore.ACTION_IMAGE_CAPTURE);
startActivityForResult(intent, 0);
}
});
}

protected void onActivityResult(int requestCode, int resultCode, Intent data) {
// TODO Auto-generated method stub
super.onActivityResult(requestCode, resultCode, data);

Bitmap bp = (Bitmap) data.getExtras().get("data");
iv.setImageBitmap(bp);
}

@Override
protected void onDestroy() {
super.onDestroy();
}

@Override
public boolean onCreateOptionsMenu(Menu menu) {
// Inflate the menu; this adds items to the action bar if it is present.
getMenuInflater().inflate(R.menu.menu_main, menu);
return true;
}

@Override
public boolean onOptionsItemSelected(MenuItem item) {
// Handle action bar item clicks here. The action bar will
// automatically handle clicks on the Home/Up button, so long
// as you specify a parent activity in AndroidManifest.xml.

int id = item.getItemId();

//noinspection SimplifiableIfStatement
if (id == R.id.action_settings) {
return true;
}
return super.onOptionsItemSelected(item);
}
}
2) activity_main.xml
<RelativeLayout xmlns:android="http://schemas.android.com/apk/res/android"
xmlns:tools="http://schemas.android.com/tools" android:layout_width="match_parent"
android:layout_height="match_parent" android:paddingLeft="@dimen/activity_horizontal_margin"
android:paddingRight="@dimen/activity_horizontal_margin"
android:paddingTop="@dimen/activity_vertical_margin"
android:paddingBottom="@dimen/activity_vertical_margin" tools:context=".MainActivity">

<TextView android:text="Camera Example" android:layout_width="wrap_content"
android:layout_height="wrap_content"
android:id="@+id/textview"
android:textSize="35dp"
android:layout_alignParentTop="true"
android:layout_centerHorizontal="true" />

<TextView
android:layout_width="wrap_content"
android:layout_height="wrap_content"
android:text="W2class"
android:id="@+id/textView"
android:layout_below="@+id/textview"
android:layout_centerHorizontal="true"
android:textColor="#ff7aff24"
android:textSize="35dp" />

<Button
android:layout_width="wrap_content"
android:layout_height="wrap_content"
android:text="camera"
android:id="@+id/button"
android:layout_below="@+id/imageView"
android:layout_centerHorizontal="true"
android:layout_marginTop="86dp" />

</RelativeLayout>
3) res/values/strings.xml
<resources>
<string name="app_name">My Application</string>
<string name="hello_world">Hello world!</string>
<string name="action_settings">Settings</string>
</resources>
4) AndroidManifest.xml
<?xml version="1.0" encoding="utf-8"?>
<manifest xmlns:android="http://schemas.android.com/apk/res/android"
package="com.w2class.camera"
android:versionCode="1"
android:versionName="1.0" >

<application
android:allowBackup="true"
android:icon="@drawable/ic_launcher"
android:label="@string/app_name"
android:theme="@style/AppTheme" >

<activity
android:name="com.w2class.myapplication.MainActivity"
android:label="@string/app_name" >

<intent-filter>
<action android:name="android.intent.action.MAIN" />
<category android:name="android.intent.category.LAUNCHER" />
</intent-filter>

</activity>

</application>
</manifest>
Preview
 W2class Tutorials for Android, Java, Php, Html

