Broadcast Receivers simply respond to broadcast messages from other applications or from the system itself. These messages are sometime called events or intents. For example, applications can also initiate broadcasts to let other applications know that some data has been downloaded to the device and is available for them to use, so this is broadcast receiver who will intercept this communication and will initiate appropriate action.
There are following two important steps to make BroadcastReceiver works for the system broadcasted intents −
- Creating the Broadcast Receiver.
- Registering Broadcast Receiver
System broadcasts
| Event | Description |
|---|---|
| Intent.ACTION_BOOT_COMPLETED | Boot completed. Requires the android.permission.RECEIVE_BOOT_COMPLETEDpermission. |
| Intent.ACTION_POWER_CONNECTED | Power got connected to the device. |
| Intent.ACTION_POWER_DISCONNECTED | Power got disconnected to the device. |
| Intent.ACTION_BATTERY_LOW | Triggered on low battery. Typically used to reduce activities in your app which consume power. |
| Intent.ACTION_BATTERY_OKAY | Battery status good again. |
Broadcasting Custom Intents
If you want your application itself should generate and send custom intents then you will have to create and send those intents by using the sendBroadcast()method inside your activity class. If you use the sendStickyBroadcast(Intent)method, the Intent is sticky, meaning the Intent you are sending stays around after the broadcast is complete.
public void broadcastIntent(View view)
{
Intent intent = new Intent();
intent.setAction(“com.w2class.CUSTOM_INTENT”);
sendBroadcast(intent);
}
This intent com.w2class.CUSTOM_INTENT can also be registered in similar way as we have regsitered system generated intent.
<application
android:icon=”@drawable/ic_launcher”
android:label=”@string/app_name”
android:theme=”@style/AppTheme” >
<receiver android:name=”MyReceiver”>
<intent-filter>
<action android:name=”com.w2class.CUSTOM_INTENT”>
</action>
</intent-filter>
</receiver>
</application>
Example
This example will explain you how to create BroadcastReceiver to intercept custom intent. Once you are familiar with custom intent, then you can program your application to intercept system generated intents.
1) MainActivity.java
package com.example.My Application;
import android.os.Bundle;
import android.app.Activity;
import android.view.Menu;
import android.content.Intent;
import android.view.View;
public class MainActivity extends Activity {
@Override
public void onCreate(Bundle savedInstanceState) {
super.onCreate(savedInstanceState);
setContentView(R.layout.activity_main);
}
@Override
public boolean onCreateOptionsMenu(Menu menu) {
getMenuInflater().inflate(R.menu.activity_main, menu);
return true;
}
// broadcast a custom intent.
public void broadcastIntent(View view){
Intent intent = new Intent();
intent.setAction(“com.w2class.CUSTOM_INTENT”);
sendBroadcast(intent);
}
}
2) MyReceiver.java
package com.example.My Application;
import android.content.BroadcastReceiver;
import android.content.Context;
import android.content.Intent;
import android.widget.Toast;
public class MyReceiver extends BroadcastReceiver {
@Override
public void onReceive(Context context, Intent intent) {
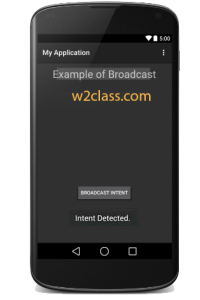
Toast.makeText(context, “Intent Detected.”, Toast.LENGTH_LONG).show();
}
}
3) AndroidManifest.xml
<manifest xmlns:android=”http://schemas.android.com/apk/res/android”
package=”com.example.My Application”
android:versionCode=”1″
android:versionName=”1.0″ >
<uses-sdk
android:minSdkVersion=”8″
android:targetSdkVersion=”22″ />
<application
android:icon=”@drawable/ic_launcher”
android:label=”@string/app_name”
android:theme=”@style/AppTheme” >
<activity
android:name=”.MainActivity”
android:label=”@string/title_activity_main” >
<intent-filter>
<action android:name=”android.intent.action.MAIN” />
<category android:name=”android.intent.category.LAUNCHER”/>
</intent-filter>
</activity>
<receiver android:name=”MyReceiver”>
<intent-filter>
<action android:name=”com.w2class.CUSTOM_INTENT”>
</action>
</intent-filter>
</receiver>
</application>
</manifest>
4) activity_main.xml
<RelativeLayout xmlns:android=”http://schemas.android.com/apk/res/android”
xmlns:tools=”http://schemas.android.com/tools” android:layout_width=”match_parent”
android:layout_height=”match_parent” android:paddingLeft=”@dimen/activity_horizontal_margin”
android:paddingRight=”@dimen/activity_horizontal_margin”
android:paddingTop=”@dimen/activity_vertical_margin”
android:paddingBottom=”@dimen/activity_vertical_margin” tools:context=”.MainActivity”>
<TextView
android:id=”@+id/textView1″
android:layout_width=”wrap_content”
android:layout_height=”wrap_content”
android:text=”Example of Broadcast”
android:layout_alignParentTop=”true”
android:layout_centerHorizontal=”true”
android:textSize=”30dp” />
<TextView
android:id=”@+id/textView2″
android:layout_width=”wrap_content”
android:layout_height=”wrap_content”
android:text=”Tutorials point ”
android:textColor=”#ff87ff09″
android:textSize=”30dp”
android:layout_above=”@+id/imageButton”
android:layout_centerHorizontal=”true”
android:layout_marginBottom=”40dp” />
<Button
android:layout_width=”wrap_content”
android:layout_height=”wrap_content”
android:id=”@+id/button2″
android:text=”Broadcast Intent”
android:onClick=”broadcastIntent”
android:layout_below=”@+id/imageButton”
android:layout_centerHorizontal=”true” />
</RelativeLayout>
5) res/values/strings.xml
<resources>
<string name=”menu_settings”>Settings</string>
<string name=”title_activity_main”>My Application</string>
</resources>
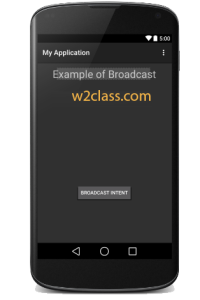
Preview:-
Preview on button click :- Now to broadcast our custom intent, let’s click on Broadcast Intent button, this will broadcast our custom intent “com.tutorialspoint.CUSTOM_INTENT” which will be intercepted by our registered BroadcastReceiver i.e. MyReceiver and as per our implemented logic a toast will appear on the bottom of the the simulator as follows −
 W2class Tutorials for Android, Java, Php, Html

